Brett Trafford Photography

  • Home
  • Services
    • Real Estate Photography
    • Commercial Photography
  • Training
  • Galleries
  • Blog
  • About
    • Bio
    • The Business
    • Our clients
    • T&C
  • Contact
  • Store
  • Exhibitions
Menu
  • Home
  • Services
    • Real Estate Photography
    • Commercial Photography
  • Training
  • Galleries
  • Blog
  • About
    • Bio
    • The Business
    • Our clients
    • T&C
  • Contact
  • Store
  • Exhibitions

Author Archives: brett365

Lesson 4 – Aperture and Shutter

/

February 16,

/ brett365

The Aperture and the Shutter are the yin and yang of photography, these 2 regulate the exposure and work together to affect the total image, and understanding their effect will take you along way down the road of mastering photography.

Aperture, if you look back to lesson one this is the opening that the light come through. On a camera it is normally a set of metal leaves that close in from the out side to leave a small round hole in the centre of the field of view. The wider the hole the more light can get in, if you ever hear of someone shooting wide open, this means that the aperture was at its widest. The wider the aperture the lower the number, so 1.8 is wider than 4.5, these numbers can also be seen on the lens, giving an indication of its speed, a low aperture lens is a faster one, due to the fact that wide open it lets in more light making for a quicker exposure. Due to technical restrictions, the faster lenses cost more to make, so a low aperture on a lens is also an indication of quality.

The Shutter is a metal curtain that opens and closes, very fast at times, to let a measured amount of light into the camera. The very first shutters were just lens caps that you removed for a set amount of time, say about 30 seconds, this was due to the time it took the light to effect the old types of film. Today’s shutters can move so fast that they only let in light for 8000th of a second and can be set to a wide rang of time, even up to multiple minutes.

The correct exposure for your image will be a combination of an aperture and a shutter speed, but if you move one and then move the other to compensate you will still get the correct exposure, but with 2 different settings. This yin and yang will continue until one or the other cannot make a corresponding move, giving you 10 or 20 different combinations of setting for the same exposure. Although the exposure in each case will be the same, the pictures will be affected in different ways; it is these differences that will govern your selection of aperture and shutter combination.

Aperture’s main effect is in the amount of natural sharpness it brings to the image, a smaller aperture will give you a sharper image. Now I say natural sharpness, as all cameras focus the light through a lens before it reaches the aperture. Left wide open the image taken just using the lens to focus will have a very narrow band of sharp image, think of a portrait with a blurred background. With the aperture closed down, that same shot will benefit from the sharpening from the aperture and have a detailed background. As we known the smaller the aperture the less light gets in so we need a longer shutter speed to get the right exposure.

The shutters effect on the image is mainly the way it effects movement. Take a picture of a bowl of fruit, this is not going to be moving, so how ever long the shutter is open the image will not change, but take a picture of a jet flying past and in a second it will have come and gone. By taking the picture at a fast shutter speed the amount of time the image is exposed, gives the jet no time to move across the CCD or film, leaving you with a sharper image as it will have no movement blur. The shutter also effects camera movement, as unless you have the camera on a tripod it will be moving by a small amount all the time, this is called camera shake. A faster shutter speed will also stop this from showing, a rule of thumb for hand holding a camera is a shutter speed to match the length of lens, so a 50mm lens need a minimum shutter speed of 50th of a second and a 300mm lens one of 300th of a second.

Put these 2 together and you get to the heart of camera settings, a trade off between speed of shutter and depth of focus, the auto setting on the camera will try to balance these two, giving a middle of the range shutter speed and aperture. A sports setting will try to pick the fastest shutter speed, to freeze the action, the landscape setting will try to pick the smallest aperture to give the greatest amount of sharpness in the image, and both will limit the selection based on the settings that give the correct exposure.

In most instances you will stick to these guidelines, but you could do the opposite, use a slow shutter speed on a fast subject to inject some movement into the image or a wide open aperture on a landscape to make only one item stand out as sharp. This can be done on a camera with only a limited number of settings if you pick the wrong one for the subject, as the camera will not know what it is taking and just do as its programmed.

Uncategorized / 4 Comments

Lesson 3 – Exposure

/

February 9,

/ brett365

We have looked at the basics behind photography and touched on the different types of camera, now to start to put the bits together.
I’m starting with exposure as it gives you a better idea of what is going on both physically and mentally in your camera.
Exposure is the term for the amount of light that hits the image collector, be it film or a CCD, a correct exposure means that the image is just the right brightness. Most cameras have an auto function on them that will set up the shutter speed and aperture to get a perfect exposure every time, well nearly every time.

Lets go back and look at the term “correct exposure”, all photography is based on personal taste, what is right for one person is not for another, each photo needs treating separately, how does the camera decide what is right? It can’t, all it can do is follow a set of basic rules of thumb and try to get close to what you want.

The camera does not see a photo as you do, its not little Jimmy playing in the snow, or fireworks over the city, it’s a small dark area against a large white area or a large dark area with pin points of light. For you the small dark bit (little Jimmy) needs to be exposed correctly, the camera see that the larger area is more dominant and exposes that. Most cameras take a number of readings from the image area and find an average mid point, if 90% of the image is light and 10% dark the average will lean very heavily to the light side, shortening the exposure and leaving little Jimmy looking very dark. With the fireworks being mainly dark you will get a long exposure leaving lots of detail in the city but a mass of bright streaks in the sky. In both cases the camera will have done its job, a correct exposure for the bulk of the picture, it’s just missed the point that you were trying to make.
Understanding how your camera thinks helps you get the best out of it, knowing what it will do to little Jimmy you have the option of making him more dominant in the picture, forcing the camera to take more notice of him. The easiest way is to make him bigger in the picture, but you may be lucky enough to have an exposure lock on the camera. An exposure lock does what is says, locks the exposure, the most common way is by ½ pressing the shutter button when pointed at the item that you want correctly exposed, you then re frame the shot and finish pressing the button. The camera will take the shot but expose it as if it was looking at something else, that something else being the item you wanted correctly exposing.

Another way is to shoot manually, if you have the option, on digital it can be as easy as shooting, looking at the image, adjusting the aperture or shutter speed and re-shooting until you get the right result, if you are doing lots of the same shot, once its set right you can usually leave it.
With film it can be more costly as you wont known what is right, so you do what is called bracketing, shooting a number of different exposures so that at least one is right.
Your camera may also have different metering modes (metering is the term for taking a light reading for exposure) these are normally just different ways that the camera judges the light in a picture, so instead of using an average for the whole shot it will maybe treat the center of the image as more important, so that little Jimmy’s 10% becomes more like 50% (this is called centre weighted) or it could take a spot right in the center and make it the most important part, turning little Jimmy into 100% (this surprisingly is call spot metering). If you can use spot metering with exposure lock, then regardless of the conditions what you deem important will be exposed correctly.

A lot of cameras come with program modes, these are auto modes but with a twist, the camera will have been set up to take certain types of image, landscape, night time or back lit, and by selecting the mode it will try to retake that type of image again. So for little Jimmy the back lit mode (as the snow behind will be a lot brighter than he is) will adjust the exposure to compensate.
Now comes the fun part, do you really want to see little Jimmy’s smiling face, or artistically is the small dark, featureless figure, against the vast snowfield more pleasing to you. As I’ve said before exposure is down to personal taste, your camera will try to help but don’t be afraid to show it whose boss, correct exposure is what’s correct for you.

Uncategorized / Comment

Lesson 2- The Camera

/

January 29,

/ brett365

When I was a member of a camera club one of the first question I was ask upon meeting a fellow member was, “what sort of camera have you got”, it was a way that they used to judge your social standing in the club. It was as if the better your camera, the better your photography, a real case of size matters.


A camera is a tool, like an artist brush or a sculpture chisel, you should pick the right one for the job, unfortunately the decision normally comes down to one thing, money. So this lesson will explore cameras and try to point you to the best one for you.

Cameras can be split into hundreds of groups but for me they fall into 2 families and 2 types.

First the families, on one hand we have the nobility, film cameras, a long history and at their best unrivaled in quality, but like most nobility now a bit down on their luck. The second family is the nouveau riche, the young pretender, Digital cameras, still fresh and full of life, but mistrusted by the old guard as just being a flash in the pan.


Now the types, the first is the SLR (single lens reflex) or normally referred to as a proper camera. Next the point and shoot camera, sometimes call a compact camera. Both types can be found in both families and can vary in quality and price.

So how to choose, well as I said cameras are just tools, so to know what camera you want, you need to know what job it is needed for, and which camera will do that job the best.

Camera families

Film or Digital, that is the question. With film, even with the cheapest camera, you have the ability to use high quality film, giving an image unreachable in detail by even the best digital cameras. So if quality of image and detail is what you need then film still has the edge, but it comes at a price, everything has to be spot on, you wont know if you have got it right till the film comes back and each time you press that button it costs you money. On the plus side it’s a great incentive to learn to do it right.

Digital, less image quality although it is coming on in leaps and bounds, the cameras are getting cheaper, giving people access to what was only available to the top photographers only 5 years ago. The plus side here is that you see your photo instantly and it cost you nothing to take a shot, I’ve used the equivalent of 277 films in a year that would have cost me £2777 just to see the photos. With digital the image is ready to put on your computer and share with the world, with film you have to scan it, which means a reduction in the quality that gives it the edge.


Film is great and as more people switch to digital you can really pick up a bargain in the second hand camera market, if you want to learn the hard way then this is it, the end result will be a good photographer, but a poorer one as the cost of taking loads of photos will add up.
With digital you will be able to take good photos faster, but its up to you if you become a good photographer, take enough photos and some will work even if you have no clue as to what you have done, the danger is that it is so easy you wont learn how it works, something you cannot afford to do with film.

Camera types

Single Lens Reflex (SLR)

These cameras are what most people think of as a proper camera, they normally come as a body, holding all the working parts, and a separate lens, which is usually part of a group that will fit the body giving different focal lengths (how close or far away the subject looks). These are the cameras you want if you are looking to do a larger range of things, the changing lenses and range of controls you normally get gives you the most scope when taking photos. The big drawback is size and weight, not to mention cost, to carry one of these with all the attendant kit can be quite a chore and can make you stand out, not good in some areas.


Compact Cameras

These start at the very bottom of the scale with disposable cameras, running on to high end all singing and dancing models. Cost equals quality in these, but not always in the picture, the more expensive the better some feature will be, but if that is an important one for you is another matter. Take build quality, you pay more for a metal body and waterproofing, but if you are using it inside you could skip that model and spend the same amount on one with a better lens. Compacts are great for most normal shots, families, parties and holidays, they don’t give you full control, but can go nearly anywhere without you being buried under tons of equipment.

Which is best? There is no best camera; it is down to the job you want it to do. After years working in the camera trade I have seen people throw money at the best kit, when a camera at a fraction of the price would have done a lot better job. Think in terms of cars, a Lamborghini is a lot more expensive than a jeep, but which would you take off road? Cost and quality do not mean it right for the job, the good news is, most of the things you need to take a good picture come from the photographer not the camera. Holding the world’s most expensive chisel will not make you a sculpture, learning how to use one might.

Note on the photos, from top to bottom

Cheap film compact
Film SLR
Digital compact
Digital SLR
Digital compact

Uncategorized / 7 Comments

Lesson 1-In the begining

/

January 26,

/ brett365

Where to start, there is so much information that you need to take a good photo and a lot of it will be personal to you, how your camera works, the right setting for the lighting conditions, how to frame and position the subject and any of a thousand variables that make a photo good. So my idea is to teach you the back ground and basics, so that you can then answer the personal questions yourself.

God is a photographer, near enough the first word attributed to him (or her), were “let there be light” and that is the main ingredient in photography, light. Light and the effect it has on the subject form the back bone of any photo and the correct capture of that light is the main aim of most of the controls on your camera. So I will start with the basic way that light is controlled and captured in a camera.

Imagine the camera is a room; it has a window with both curtains and a wooden shutter. If you open the curtains fully and open the shutter for 1 second, you will let an amount of light into the room. If you nearly close the curtains and then open the shutter for a second, you will let a lot less light in, but if you leave the shutter open for longer you will eventually let in as much light as you had done with the curtains open.

The wall opposite the window is being exposed to the light, the longer you leave the shutter open, the longer that exposure. Technically if the window was a lens, you could tape some photographic paper to the back wall and use it to take a photo, don’t laugh this is really how the first camera worked, although the artist hung normal paper and copied the image, like tracing a picture projected on a screen.

So the controls on your camera basically manipulate only 2 things the curtain (Aperture) and the shutter, the way they vary the length of time the shutter opens or how wide the curtains are, will effect the final photo, but regardless of what camera you have it will always go down to the interaction of just these 2 parts.

Now we have the light trapped how do we get to see it? Traditionally the light fell onto photographic film and a chemical reaction took place, more often now it falls on to a charge-coupled device (CCD) that converts the light into an electrical image by magic. Again no matter what camera you have this is always going to be the end of the road for the light, hitting some form of image gatherer.

One last player in the journey of the light is the thing it comes through to get into the camera, the lens. For most people this is the item that is most over looked and it is the one that can really separate good cameras from bad. Light coming into a room through a window will not form an image on the back wall, that light needs to be gathered and focused by a lens so that an image is seen, the better the lens the better the image. The shutter opens and closes, the aperture does just the same, they either work or they don’t, regardless of the camera these 2 are very much black or white. The lens is the grey one, it can make changes to the light, alter the sharpness and even the colour, exposure if correct will be the same in every camera, but light coming through a lens is different for each lens.

These are the basic players in the drama that is photography, how they interact is going to be the focus of the next few lessons, but to finish up this one the biggest rule to taking good photos.

When ever I show a picture to someone, the first comment I get is usually, “you must have a really good camera”. Yes I have, but, no camera I have ever owned (or ever will) has ever got off its arse, gone out, got rained on, got muddy and wet and taken a picture for me (I really wish they would then I could just sit in the warm reading a book). The biggest single rule, in fact the only one you must do, is to go out and take pictures, its not the camera that counts it is where you get it to. Most modern cameras will capture a sharp well exposed image, that why they are called cameras, it what you point them at that is important. An expensive camera that sits in a bag and never takes a shot will never beat the images captured by the cheapest point and shoot, if that camera is pointed at something interesting. The quality of your images is normally a direct correlation to the effort you put in, look at some good pictures and then think what it took to be stood there, given that you were in the same place at the same time with whatever camera you have, could not you have taken a similar photo?

Uncategorized / 3 Comments

Photography course, Introduction

/

January 21,

/ brett365

Welcome to the first part of my photography course, the aim of this is to improve your photography and the important word there is YOUR.
Photography is a difficult subject to quantify, it’s part science, part art and part history, you can become a master at the technical side, know all the major photographers and their techniques and still be unable to take a single photo anyone likes. This is because its an art form and when all is said and done, regardless of how the image was captured, it’s the image its self that’s important.
Years ago I started to take pictures to please other people and soon started to hate photography, I had gotten away from one of the basic goals of taking pictures, enjoyment. Once I had realised this I started to shoot images that I liked, the result was I enjoyed it more and took more photos and started to create images that made me happy.

So back to the aim of the course, if you are looking for in-depth technical analysis, long winded historical comparisons of past masters or three rules to make you gods gift, go back to Google. If you want to improve your shots and get more enjoyment out of your pictures then read on.

Back to the word YOUR, they are your photos, your images, your art and the only person that has to like them is you, otherwise what’s the point spending time, money and effort taking them, so before we even get to thinking about how to take photos what you need to do is to think why you want to take photos and what photos you want to take.
If you give someone a camera and tell them to go out and take 10 photos, the shots you get back will be a mixed bag of images with very little to connect them and with very little thought behind them. If you ask the person to go out and take 10 photos of 10 buildings, that is what you will get, but they will still be disjointed and to a degree unconnected. But if you then add that you want them to show the development of the town through the ages, you should end up with 10 images that link together and have a lot of thought behind them.

Pre course work, Sit down and think what you want to do with your photos. Is it to win competitions, recording family events, capture beautiful scenes or to help with another project. Review what you have already taken and see if it fits in with what answers you have just come up with, being able to judge if it fits or not and why, will highlight what you need to work on and what you do well. There is no right or wrong, only what works for you, the blurred badly exposed and poorly framed shot of your first born first smile, while a poor photo, is priceless to you and shows that you have mastered one of the most important of all photographic lessons, have your camera ready and take the shot, they are normally gone before you can blink.

Uncategorized / 17 Comments

Joined up pictures

/

July 11,

/ brett365

When shooting photos for a joined up image the most important thing is to plan the shot before hand, by this I mean take the shots for the project, not get home and pick shots taken as individual picture. When taking the shots,

  1. Set the 2 edges in your mind
  2. lock the exposure and focus for the whole set of shots, if your on digital take a shot of the middle that’s correctly exposed and focused and lock at that.
  3. Over lap the shots, the more the merrier.
  4. Try to pan smoothly, keeping the camera level.

Once done you should be left with a set of shots that should nearly fit together with out any computer help, like these.

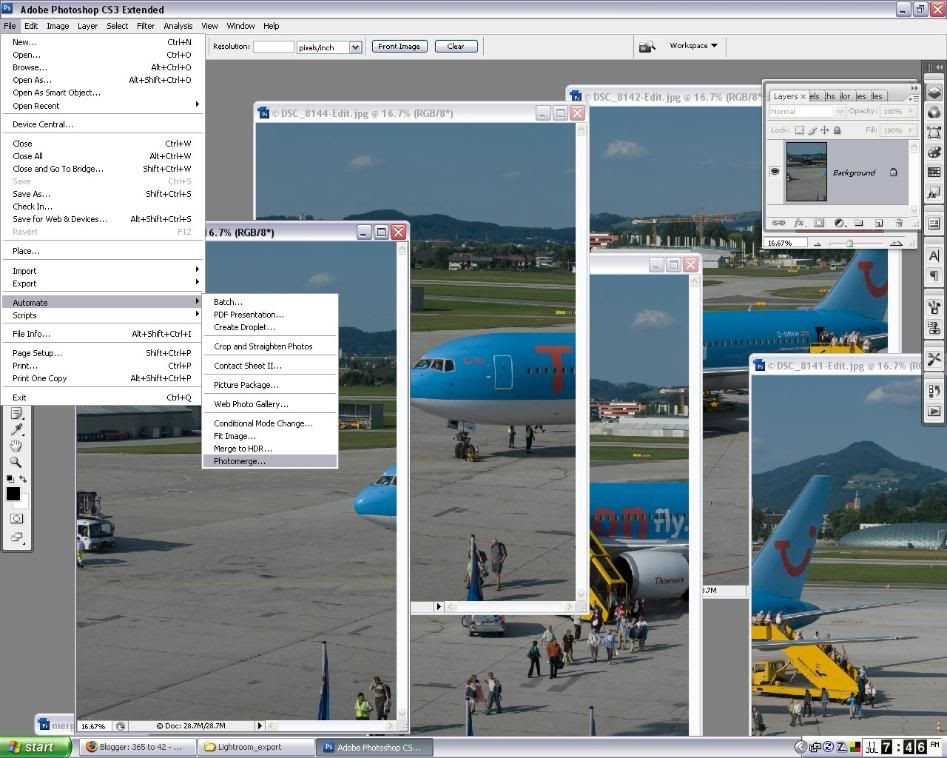
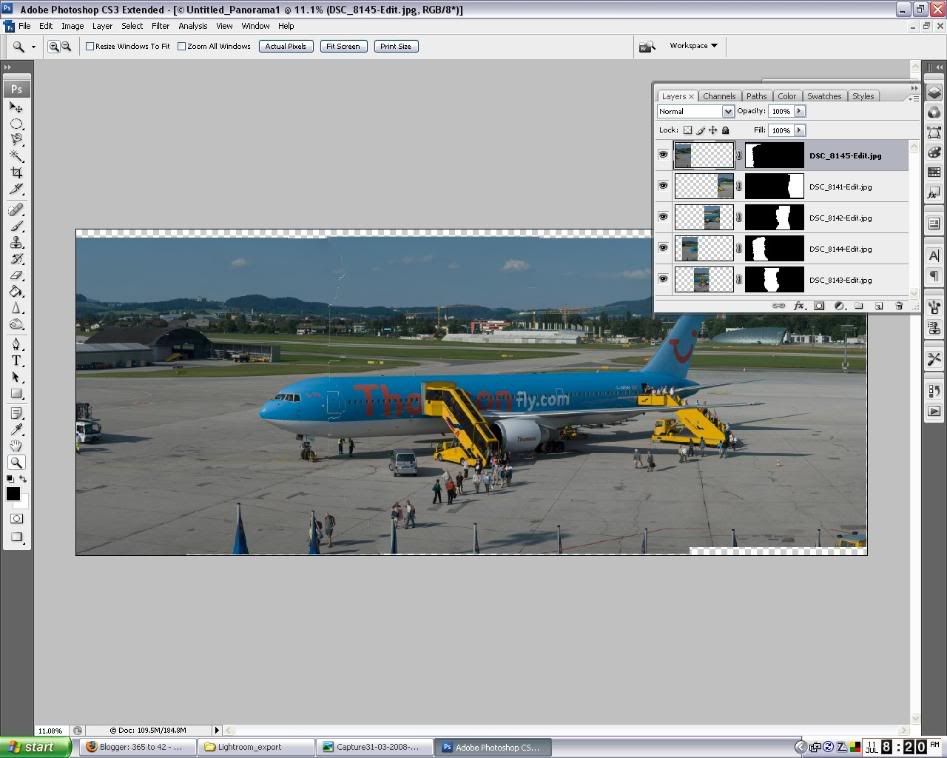
The next steps take place on Photoshop CS3, it will differ on other software, but not by too much.

Select Automate, Photomerge.


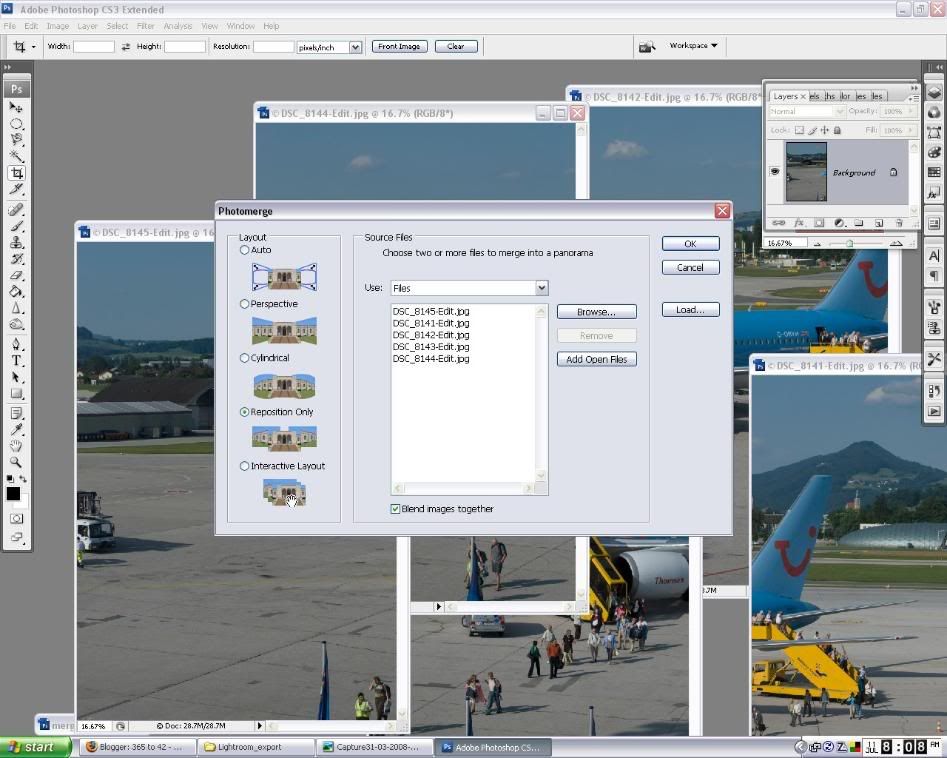
I use the standard join most of the time, but try all of them to get the effect you want, select the images and hit go.

This is where the planning of the shot comes in handy, if you have taken the picture as directed the final image should be nearly perfect.


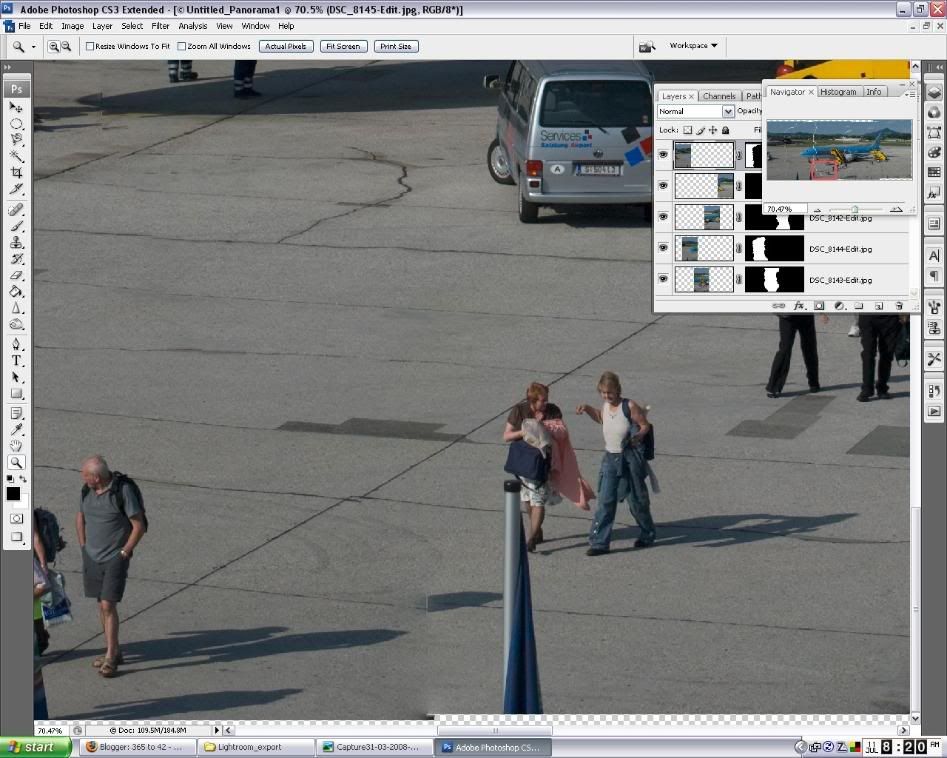
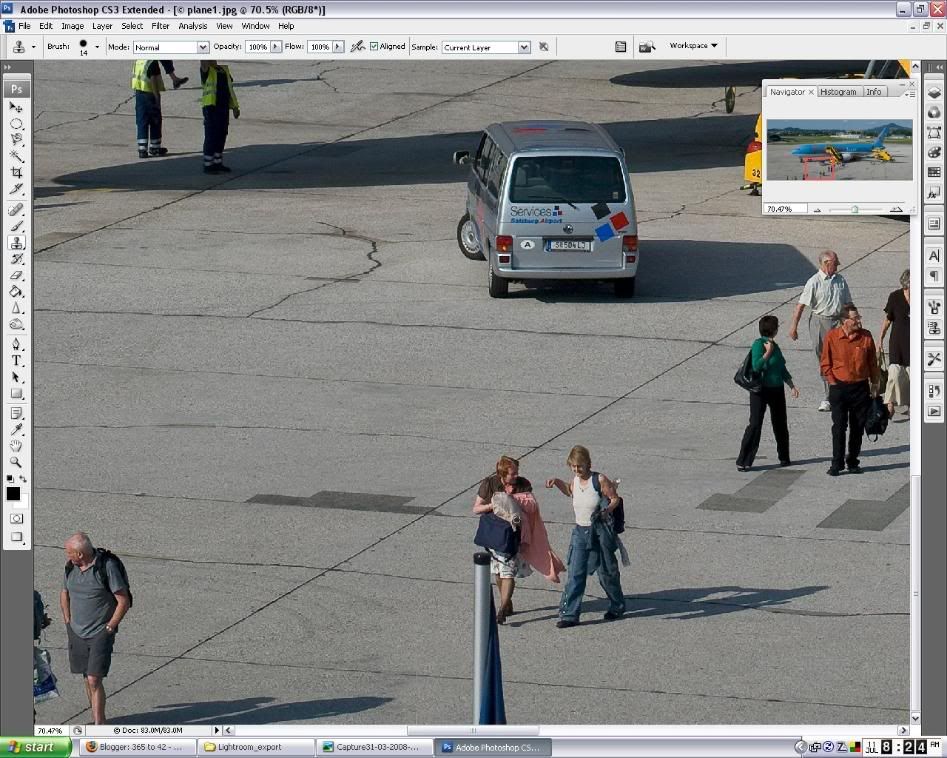
But in this case some of the people have moved giving a ghost of a shadow, a quick play with the clone stamp removed this, then you crop and save.

Uncategorized / 8 Comments

Photographing fox cubs

/

May 8,

/ brett365


Let me start by saying that I have being trying to photograph fox cubs for over 15 years, even on my wedding day, so it has become a bit of an obsession.

Why Foxes, well in the UK we don’t have many animals that can provide such a challenge, they are the closest thing to a wolf that we have, extremely clever, very observant and normally will try to keep away from man. On the plus side they are photogenic and as beautiful as you can get.

The first stage of the hunt starts in the depth of winter, only then can you spot tracks, paths and holes that in a few months will be hidden by undergrowth. So after many cold day spent wondering the woods and fields you will, hopeful, have identified a number of holes, maybe you have even see a fox or two.

The next step is to wait until late April, early May, and then revisit the holes looking for cubs or signs of activity; feathers are normally a good sign, but not for the bird. The draw back is that foxes move holes and can hear you coming normally before you see them, so every hole could look empty, patients is now the order of the day, keep trying until you get lucky.

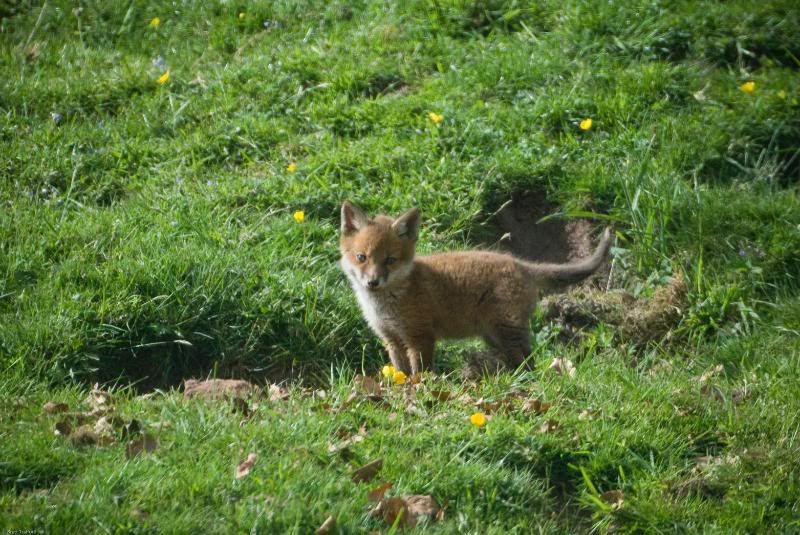
Then it happens, you see a hole and from nowhere a cub bounces into view, its always just appears, one minuet nothing the next, cub. Now the hard part starts, first, cubs are small, the size of a small cat, second, they are very a where of the dangers around them, and will vanish at the slightest sound and lastly, they do tend to be in places you cannot sneak up on.

My kit for taking these photos is very basic, a Nikon D80 with a 70-300 zoom and a 600 mirror lens, a camera bag that doubles as a tripod (I’m normally lying down and rest the camera on the bag) and a camouflage jacket and old trousers. The approach in these photos was on my belly over a field covered with cow pats (so it was a bit of a zigzag) moving a foot at a time when they weren’t looking (a bit like a kids game). Even with the long lens and bright light the camera was still set to 800iso and was at the limit for hand held shots.

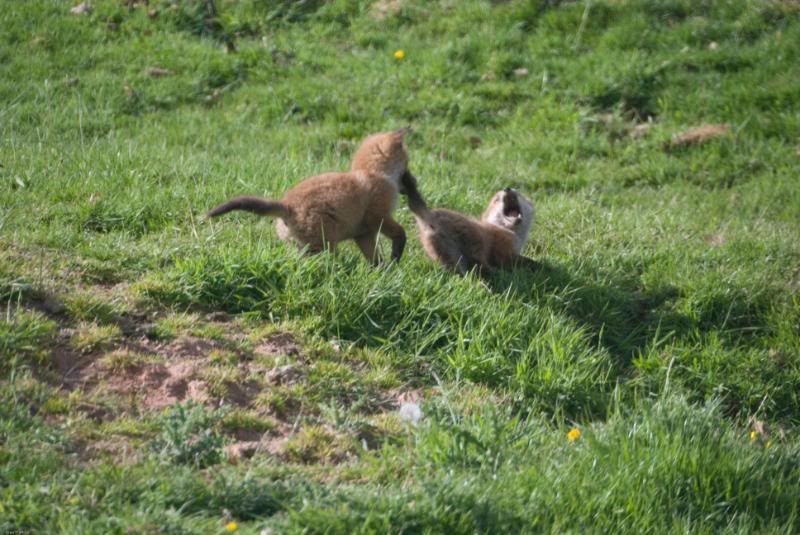
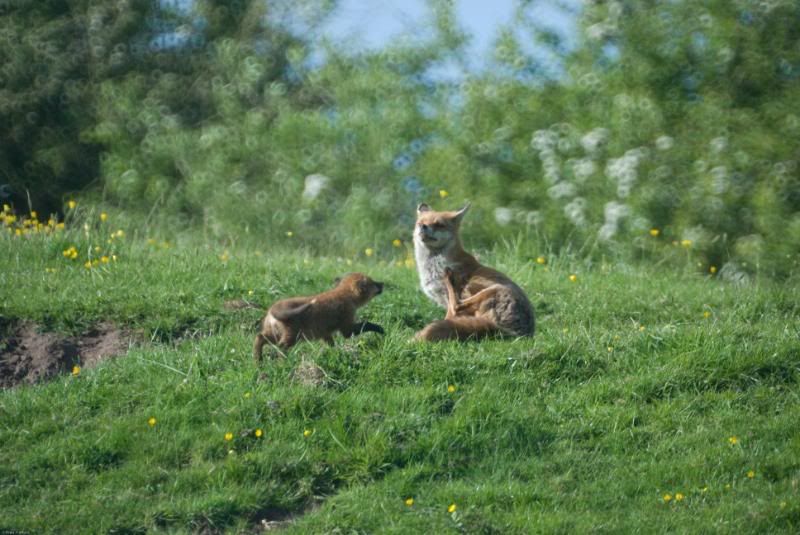
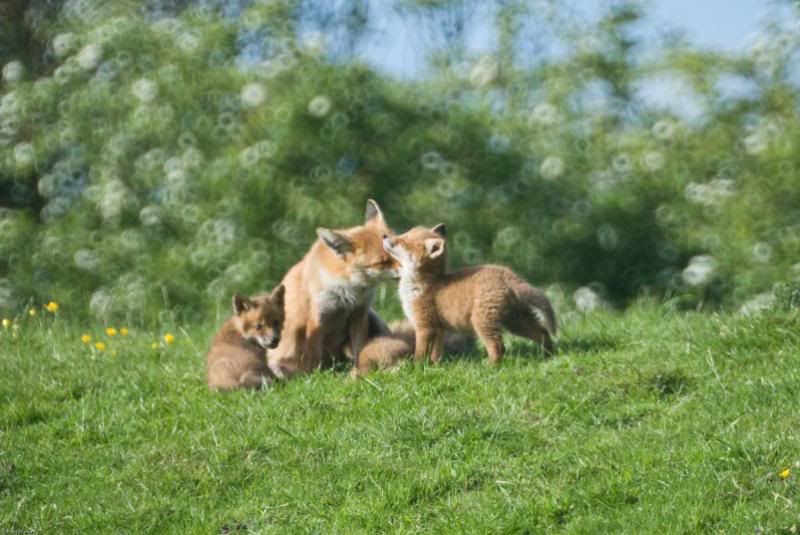
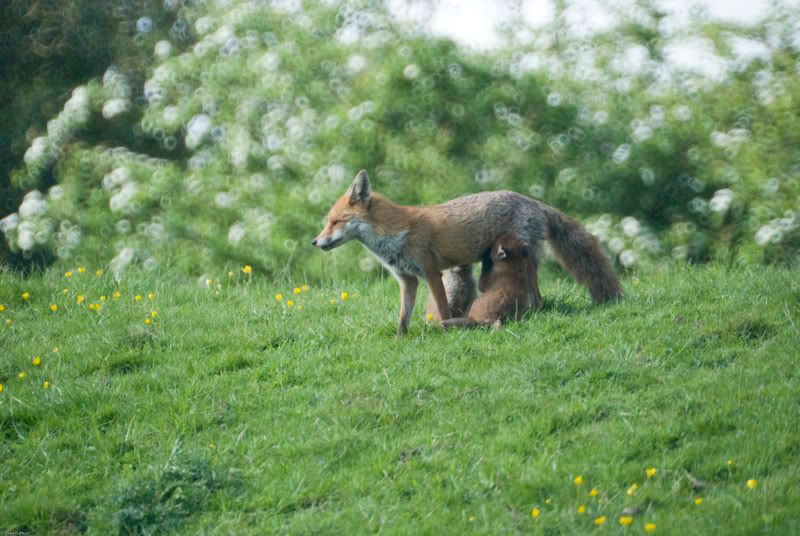
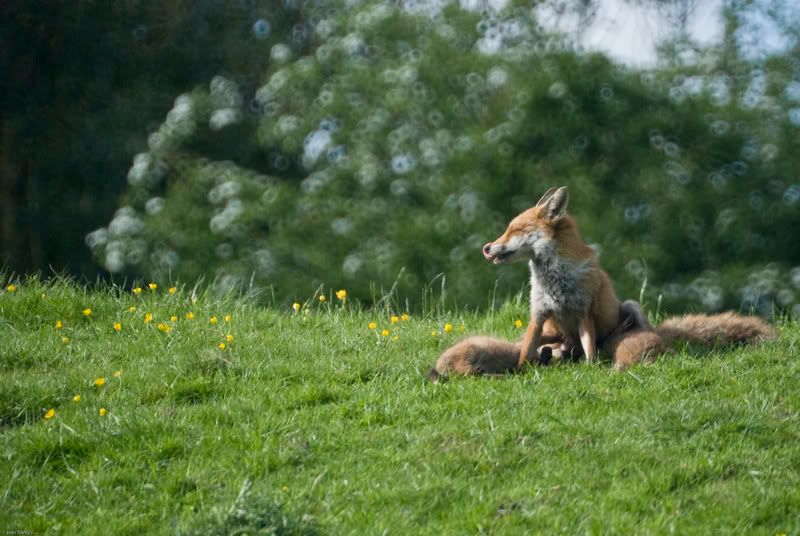
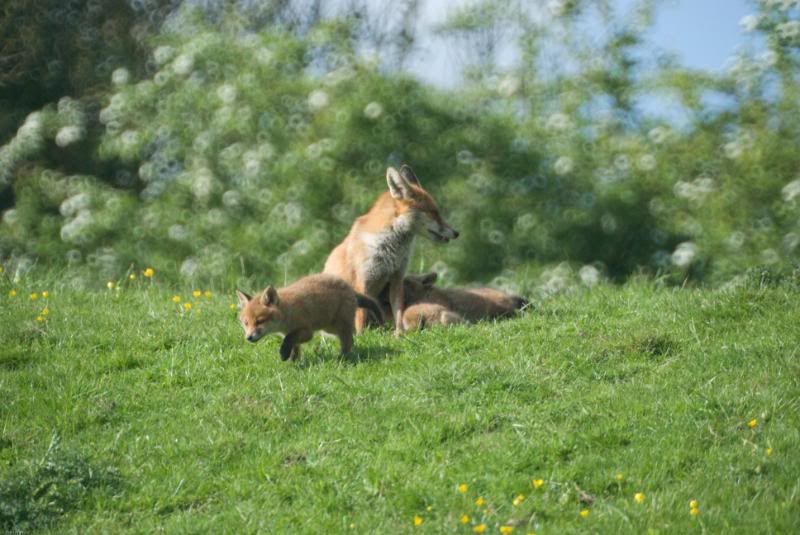
As for the picture I will let them speak for themselves, mum went walk about after ½ an hour and so the cubs amused themselves and I got a bit closure. Around 6 months work and preparation for an hours shooting, I would not have changed a thing.


Uncategorized / 33 Comments

Post navigation

Older 1 … 9 Load more
 ©  Brett Trafford Photography. All Rights Reserved.        brett@bretttrafford.com        tel 07801 058345